Mobile Testing - iOS Part 1
In this post I'm going to run through some of the pre-requistes that need to be done prior to starting a mobile app testing on iOS.
I would recommend grabbing yourself a cheap Macbook or a Mac Mini. Whilst it's not completely necessary, there are some tools which are exclusive to Mac and I also wanted to have access to Xcode. Of course, if you don't want have access to a Mac, any good Linux distro should see you good. If you attempting to do this from Windows however, your probably going to have a difficult time with the tooling and although some testing is possible, I wouldn't recommend it.
I opted for a Mac Mini (late 2012) which I picked up 2nd hand (i7 2.6ghz quad core, 16GB ram, 500GB SSD running macOS 14 Sonoma using OCLP) for £140. You will also need an iPhone for testing. I use a iPhone 7 which is running version 15.7.3 and I've also disabled auto updates for the phone because I want to keep the phone on 15.7 as this seems to be the sweet spot for jailbraking and getting all tooling to work. (As of time of writing this article).
So before we go any further lets take a quick look at the updated Xmind diagram to refresh ourselves with what we are trying to achieve, take a look at my initial post in this series https://chris-young.net/mobile-testing-getting-started/ .
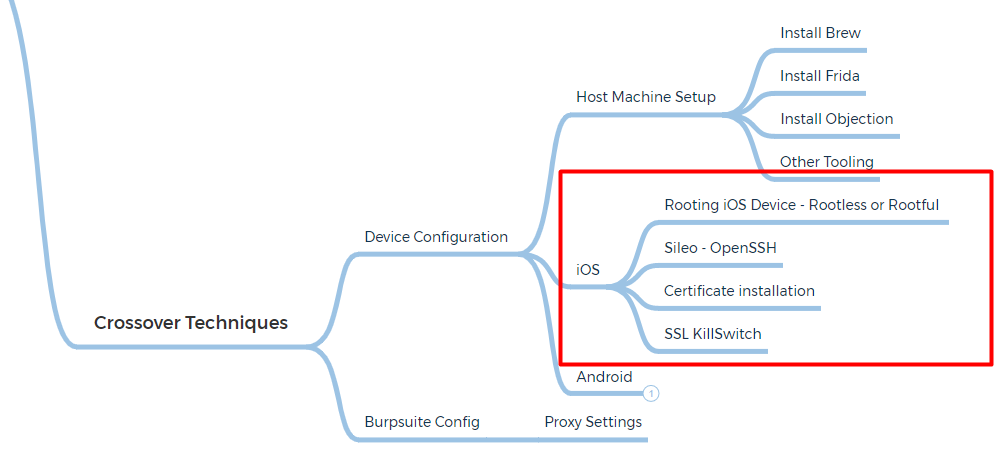
I've broken the Crossover Techniques into different sections, expanding from our previous model - In this post, we will be looking specifically at iOS Device Configuration as shown in the red rectangle.
Rooting iOS Devices
Rootless or Rootful ?
In the context of iOS jailbreaking, "rootless" and "rootful" refer to the level of access and permissions that the jailbreak provides to the user, particularly in relation to the "root" user.
Rootful Jailbreak:
- In a rootful jailbreak, the user gains full access to the root user account on the iOS device. The root user has elevated privileges and can modify the system files and settings.
- With root access, users can install applications, tweaks, and themes that have deep integration with the iOS system, allowing for extensive customization and control.
Rootless Jailbreak:
- A rootless jailbreak, on the other hand, provides a more limited level of access compared to a rootful jailbreak. It might not grant full root access to the user.
- Rootless jailbreaks often focus on achieving specific customizations or installing certain apps without providing the user with unrestricted access to the iOS file system or system settings.
To achieve the jailbreak, I used Palera1n, however there was a couple of things that I didn't know when I did the initial jailbreak:
- If you power off the phone or the battery dies you will need to re jailbreak the device again.
- Make sure you jailbreak the phone using the Rootful mode, this is required for SSL KillSwitch 2 to be able to work. Use the following commands or follow the guide underneath:
### Download on Mac ####
sudo /bin/sh -c "$(curl -fsSL https://static.palera.in/scripts/install.sh)"

### Run Palera1n - use the -f flag for Rootful mode
palera1n -f -e thid_should_crash=0Sileo
Installing OpenSSH & New Term
All going well, if you were following the instructions above, you should now have Palera1n installed. Once the device boots up, open the palera1n loader app and tap Sileo. After a bit of time, you'll be prompted to set a passcode for using command line stuff, and then you should see the Sileo icon on your home screen.

Sileo is an alternative package manager for jailbroken iOS devices. It serves a similar purpose to Cydia, which was another popular package manager for jailbroken devices a few years ago. Package managers like Sileo and Cydia allow users to discover, download, and install software packages (apps, tweaks, themes) from external repositories that are not part of the official App Store.
Two apps that you'll want to install from Sileo is NewTerm, which will allow you terminal access on the device itself, and the other is OpenSSH so that you can connect to the device directly from you testing machine, assuming that the mobile device and testing machine are on the same WiFi network.
Next step is to verify that you can access the device from your testing machine. At this point its also a good idea to give your device a static IP address prior to using SSH. You also have two options for logging in, using either the "mobile" or "root" user. Regardless of which one you choose, the password for both is the same: "alpine".
PS C:\Users\Chris Young> ssh root@192.168.0.75
(root@192.168.0.75) Password for root@iPhone:
iPhone:~ root# uname -a
Darwin iPhone 21.6.0 Darwin Kernel Version 21.6.0: Sun Jan  8 22:45:56 PST 2023; root:xnu-8020.241.19~1/RELEASE_ARM64_T8010 iPhone9,3 arm Darwin
iPhone:~ root#
Certificate Installation
Burpsuite
In order to capture any browser and mobile app traffic from your testing device, you'll need to configure both Burpsuite and make a few changes to the WiFI settings on your iOS device. To do this, you need to do the following:
- Configure your Burp Proxy listener to accept connections on all network interfaces.
- Connect both your device and your computer to the same wireless network.
- To interact with HTTPS traffic, you need to install a CA certificate on your iOS device.
PortSwigger already has a great walkthrough on how to do this, check the link below:

SSL KillSwitch
So hopefully you've been following along and we have reached the point of installing SSL KillSwitch v2. This is done on the device by first logging into it using SSH and then using the "wget" command to retrieve SSL Kill Switchv2. (Install wget via Sileo if it hasn't already installed or use apt-get wget)
Example shown below:
PS C:\Users\Chris Young> ssh mobile@192.168.0.75
(mobile@192.168.0.75) Password for mobile@iPhone:
iPhone:~ mobile% wget https://github.com/nabla-c0d3/ssl-kill-switch2/releases/download/0.14/com.nablac0d3.sslkillswitch2_0.14.deb
iPhone:~ mobile% dpkg -i com.nablac0d3.sslkillswitch2_0.14.deb
iPhone:~ mobile% ls
Applications/  Documents/  Library/  MobileSoftwareUpdate/
Containers/ Downloads/ Media/ com.nablac0d3.sslkillswitch2_0.14.deb nabla-c0d3
Back on the device itself, navigate to Settings, scroll down and then locate SSL Kill Switch2. Tap on the tab to open it and then enable "Disable Certificate Validation".
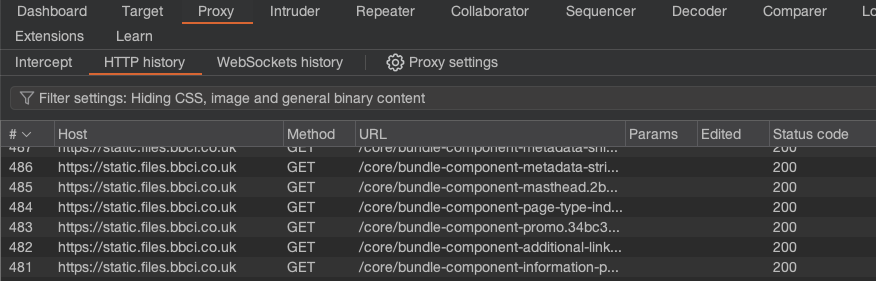
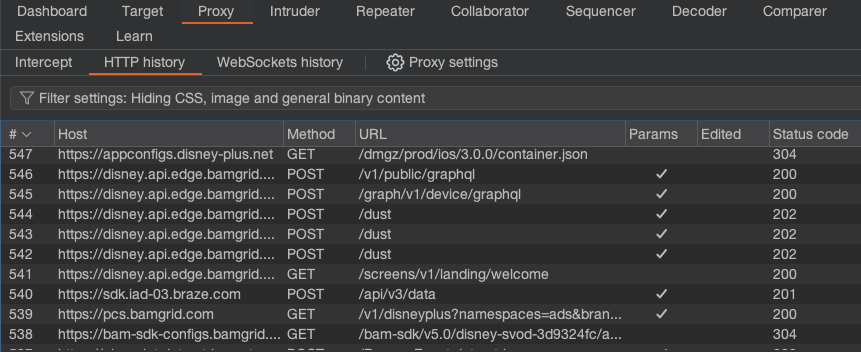
At this point, we can verify if the SSL Kill Switch is working by returning to BurpSuite, enabling the proxy you setup using the instructions from PortSwiggers site. Open Safari on the device and try browsing to a couple of sites, then pick an app and check to see if it's traffic is proxying via Burp.
Safari - bbc.co.uk
Disney+ App
Now that we can see the requests going via Burp, we can start to get an overall picture of how the application is making requests, which endpoints its communicating with. Essentially we can almost treat this in a similar manner to doing a typical web application test - navigating the app and mapping out its functionality. However its at this point where we will change direction from most online tutorials and we will start to look at the an iOS application in more depth using the techniques from Owasp's MASTG.
Be sure to look out for iOS Part 2 soon.
- If your not seeing the traffic proxying via BurpSuite double check your settings on both the testing device and within Proxy Settings in BurpSuite. Remember, you will have to manually set the IP address and port on the device to match the Proxy Settings in BurpSuite.