Creating a malicious mobile app environment - Part 1 of 2
This article (part 1 of 2) is based around my final submission from my MSc project that I completed last year(2016). A lot has changed in Android security landscape since then, however I thought this post would be of interest to those who are looking to undertake a similar project. In the next few posts I will introduce you to my research, which includes some content from my final paper and project findings.
Project development
The idea for the project came about from a picking up a leaflet from a high street retailer. The leaflet was encouraging users to scan a QR code, connect to their instore wifi and download a reward card app onto their mobile device in order to receive a discount. My initial thoughts were how could I use such a scenario and manipulate it to create an environment to attack mobile devices? Some of you may already be asking, why would you want to attack such as device ? To understand this, lets have a quick look at mobile device usage.
Mobile device usage
The rise of mobile device consumption and its subsequent use in today’s society has seen an increasing trend whereby consumers are moving away from traditional desktop computing for the consumption of online content. Mobile devices can no longer be thought of as just being a device for making and receiving phone calls.The modern mobile device offers users a plethora of services and functionality without the physical restrictions that are commonly associated with desktop computers. The ability to connect, consume and interact with content without physical or locational boundaries has resulted in users placing a dependency on mobile devices to carry out and complete both personal and business tasks.
As such, this dependency has attracted the attention of cyber criminals who seek to target mobile devices in order to extract personal information and data for their own financial gain.These criminals are now using a combination of hardware, software and social engineering techniques to create a variety of different methods to extract information from not only the mobile devices but also the users of these devices. With many users unaware of the risks posed by mobile devices and their associated applications, an avenue of opportunity is introduced to criminals whereby they can start the process of attacking mobile devices.
Technial Overview
To start with, I tried my hand using the Smartphone Pentest Framework created by Georgia Weidman, however the framework was already a few years out of date and I wasn't really having much success in getting it to work. So I changed plans and decided to create an environment from scratch.
The following diagram notes how I envisioned the environment developing:
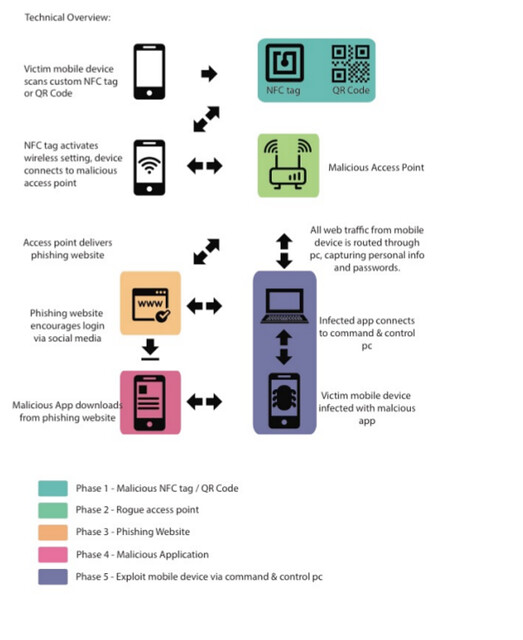
For the remainder of this post, we will look at Phase 1 - creating a malicious NFC tag/QR code and Phase 2, setting up a rogue access point.
Phase 1 - Creating a malicious NFC tag/QR code.
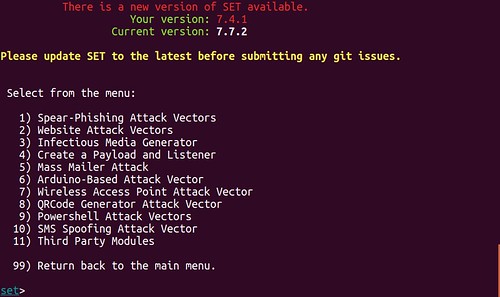
The QR code is created using the Social Engineering Toolkit (SET). SET is an open source tool that contains specific attack vectors for use in social engineering environments. The tool contains a specific module to generate QR codes based upon the attackers input. The main objective of the QR code is to act as pointer, directing the users mobile device to the rogue access point. At this point, its worth noting that the rogue access point will be a Wifi Pineapple Nano.
SET is accessed via terminal using the following syntax: sudo setoolkit
SET uses a numerical based navigation system. The QR code creation module is found under the following menus:
1 – Social-Engineering Attacks
8 – QRCode Generator Attack Vector
SET prompts for a URL to be entered. This URL is converted into the machine-readable graphical data of the QR Code. The URL of the rogue access point (WiFi Pineapple Nano) is given: http://172.16.42.1

A confirmation message is generated noting the directory location, file name and the graphical file format of the QR code: /home/chris/.set/reports/qrcode_attack.png
The QR code generated above is stored in the .set directory. The period prior to the directory name denotes that the set directory is hidden. In order to access the QR code, the following syntax is used to access the directory, list the contents of the directory, and copy and rename the QR code to the home directory.
cd/home/.set/reports ls cp qrcode_attack.png /home/chris/qrcode.png
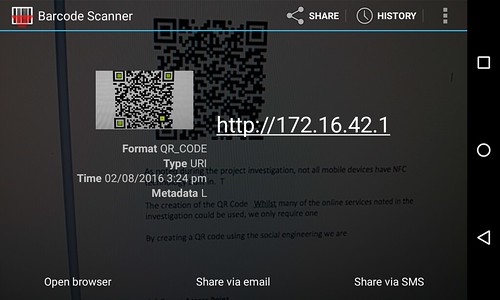
The resulting QR Code is displayed below:

The following screenshot confirms the URL data pointing to the rogue access point has been successfully written to the QR code. Subsequently when a mobile device scans the QR code, the user is prompted to open a browser on the device that will connect to the URL of 172.16.42.1.
Creating the NFC tags
Data is written to the NFC tag using a Google Nexus 4 mobile and the NFC Tag writer Application by NXP. This application allows datasets to be written and erased from the NFC tags. NFC tags are available in various physical shapes and sizes, for the purposes of this project the tags used are unbranded clear stickers, these tags are relatively cheap to buy, approx £2.00-£5.00 depending on how many tags you need.
In order to ensure that there was no data variation between the QR codes and the NFC tags, all data written to the NFC tag is an exact duplication of the information provided during the creation of the QR code.
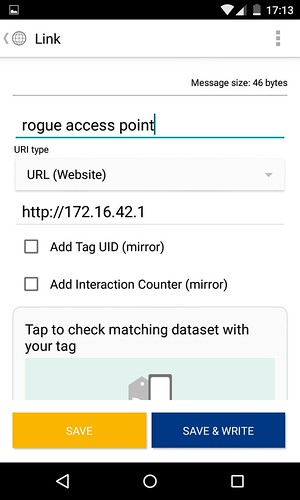
The NFC writer application provides the functionality required to create and write datasets to the physical NFC tags. The “Write tags” button contains the option to copy the previously generated QR code shown above. Select the "Copy QR Code" option.

Once scanned, the application copies the data and provides the option for a custom label of “rogue access point” to be added. This label is not visible when a victim scans the NFC tag; it is saved internally within the application as a dataset should you wish write the same data to multiple NFC tags.

The “confirm overwrite” option ensures that any data previously stored on the NFC tag is overwritten with the new dataset. The add launch application option can be configured to make a previously installed application on the mobile device start automatically when the NFC tag is scanned. A third option of protecting the NFC tag is also available at this stage. Although not used during this example, the use of this option prevents the NFC tag from being overwritten. This option would be required if the tags were to be deployed in a real world scenario.
To store the dataset, a NFC tag (NTAG213 specification) is tapped upon the back of the Nexus 4. A confirmation screen to confirm that the dataset has been written is also displayed. The new content section confirms that both the basic and advanced options have successfully been written to the physical NFC tag, as shown below:
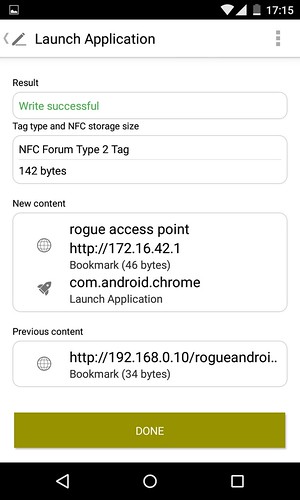
The NFC tag now provides the same functionality as the previously created QR code and both are ready to be deployed as part of the malicious environment.
Phase 2 - Setting up a rogue access point
For the rogue access point to be able to function as a wireless network point, it must first be connected to a laptop via a USB connection. This USB connection essentially allows the WiFi Pineapple to use the client machines network connectivity, thus allowing the WiFi Pineapple to be setup as its own wireless network. The process of sharing the network access between the WiFi Pineapple and the laptop is done via a bash script.
This script is available from the WiFi Pineapple developers Github repository. Upon downloading the script to the laptop, the script is made executable using the following syntax via the command line terminal: chmod +x wp6.sh The executable script is then run using: sudo ./wp6.sh
Using the guided setup option, the script uses a three-step process. In step one, the script attempts to detect the default gateway address of the network router that is providing the client machine with network connectivity. In this project, we are using a home wireless network so the gateway shown is 192.168.0.1. The second step determines the Internet interface being used on the client machine, which is wlp2s0. The third and final step asks for the Wi-Fi Pineapple to be connected to the client machine via the USB cable, this then creates an interface within the Wi-Fi Pineapple.
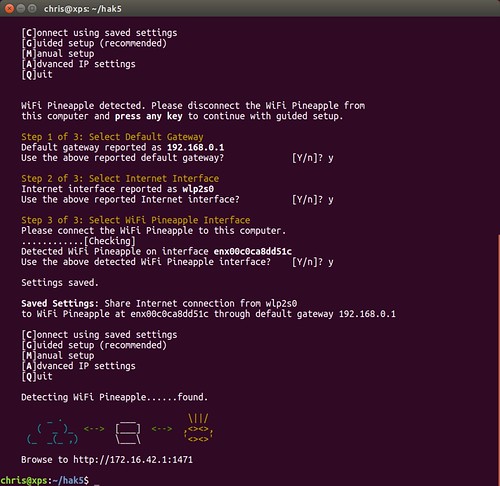
The Wi-Fi Pineapple configuration can then be accessed via the following URL http://172.16.42.1:1471
Three modules are used during the setup configuration; the networking and filtering modules are required to get the device to function as the rogue access point. The final module, clients, is used to confirm that all of the test mobile devices being used can successfully connect to the access point.
Networking Module
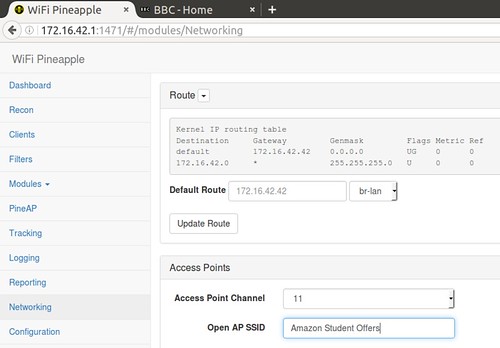
The networking module is used to configure the SSID of the access point that the test mobile devices will connect to. The SSID used during this project is Amazon Student Offers. The default access point channel remains unchanged. The networking module also provides us with the routing information, noting the default gateway that all traffic from the mobile devices will be routed through prior to connecting to the client machine, as shown below:
Filtering Module
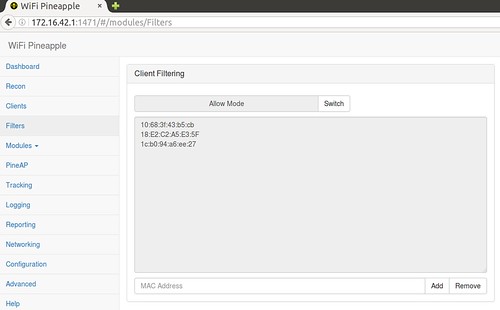
In order to ensure that only the test mobile devices have connectivity to the rogue access point, each MAC address from the individual devices are added manually to the list. MAC address filtering is then applied using the Client Filtering module. The default configuration of this module is set in the DENY mode, which prevents the test mobile devices from connecting. The mode is changed to ALLOW, this allows only those MAC addresses in the list to connect.
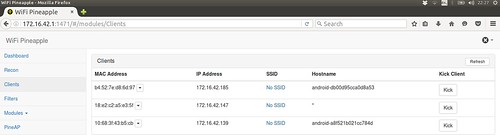
Clients Module
The final module provides confirmation that all three devices have successfully connected to the rogue access point. The MAC addresses are displayed, alongside the IP addresses allocated to each device.
After the completion of the above noted modules, the rogue access point can be considered as fully configured. As a result, when a mobile device connects to the rogue access point with the SSID of “Amazon Student Offers”, the Wi-Fi Pineapple will allocated the device a IP address via DHCP. When the mobile device requests a website from a web browser, the network request will travel through the Wi-Fi Pineapple to the client machine before travelling out to the Internet via my home wireless network. Subsequently, the client machine becomes the default gateway for all network traffic travelling from the Wi-Fi Pineapple to the outside world, thus placing it in between the home wireless network and the mobile devices. This creates an environment that allows for Man in the Middle (MITM) attacks to take place.
The following diagram summaries the environment created so far:

In the next post:
We will look at creating the website which will be used to host the malicious application, and of course start the process of decompiling a genuine android application to make it malicious.